What is Remote PC?

Remember when one wanted to access their physical Windows desktop from off site or another location within the building we generally used Remote Desktop Protocol a.k.a RDP. You may be familiar with the icon:

AppVError2017-12-28 11_32_09-Citrix Receiver - Internet Explorer

RDP is a Microsoft connection protocol that has been around for quite a few years. However, as popular as it is there are also limitations with using RDP.

  • users cannot use multiple monitors
  • resizing the screen is a painful experience
  • multimedia capabilities are limited
  • graphics are limited

In order to give the user the best experience possible let us introduce Citrix RemotePC. RemotePC is based on Citrix’s ICA HDX protocol which is far superior than RDP and gives us the capabilities of the features that I listed above.

What are some of the differences?

When a user traditionally launches RDP to access their physical desktop from outside of the office, users generally log into the Citrix Storefront and launch the published application RDP as noted from the icon above.

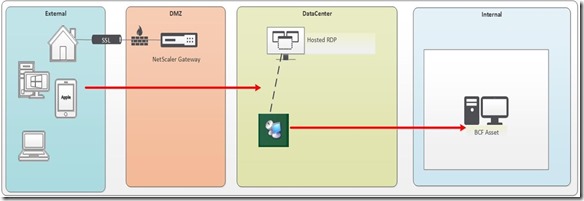
In the diagram below we see that we actually initiate a “two step” process by launching the application RDP that is hosted on a server, then we make a 2nd connection to our physical PC

remotePC1

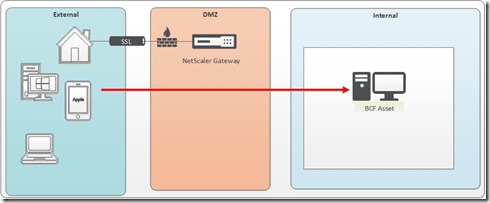
By using RDP we are adding a 2nd hop to our connection. RemotePC is different in that we are connecting directly to our physical PC without having to launch an application.

remotePC2

Connecting to the Console of the physical PC

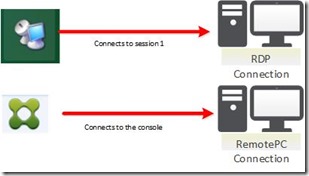
RemotePC enables the best user experience as the connection is to the PC’s console vs RDP which actually connections to something called “session 1”.

remotePC3

This is significant to the user experience as RemotePC is just like sitting down at the physical desktop to work. Being able to connect to the PC’s console session allows us to use Multi-monitor support and resizing of the screen dynamically.

In order to use Citrix RemotePC the Citrix team simply has to install the agent onto your physical desktop.

XenServer Fresh Install

Been a while since we created a doc on an install so we thought we would update how to install a XenServer 7.1 LTSR.

From ISO

image

image

image

After the XenServer install we wanted to join the pool but received this error due to we have HP snmp installed on the other hosts in the pool.

image

How to install the HP Agent

This was a bit tricky but since this is an upgrade from 6.5 to 7.1 I had to obtain the one for our version

I initially tried this install

https://support.hpe.com/hpsc/swd/public/detail?swItemId=MTX_7b37f0101fff497d80265eec78#tab3 hp-agents-10.40-3.XS7.0.iso but ran into issues per this forum

https://community.hpe.com/t5/ProLiant-Servers-ML-DL-SL/Xenserver-HP-SNMP-Agents-for-Xenserver-7-1/td-p/6945225

This forum pointed me to this link

https://support.hpe.com/hpsc/swd/public/detail?swItemId=MTX_c550f218f9594d59b9c0c99784#tab2 hp-agents-10.50-2.XS7.iso

The first item was I used WinSCP to upload the folder to the host to the home drive

image

Then I ran these series of commands to install

cd /home

mkdir /mnt/iso

mount -ro loop hp-agents-10.50-2.XS7.iso /mnt/iso/

cd /mnt/iso/

./install.sh

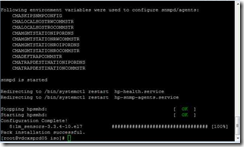
The install went without issue

image

Configure Network        

image

image

Configure Storage ISCSI Connection

Once the storage guys have your IQDN number…..

image

There is a series of commands you invoke to configure the multi-pathing and discover. The Storage guys gave me a script I could run….

#add NetApp discovery
iscsiadm -m discovery -t sendtargets -p 192.168.49.51
iscsiadm -m discovery -t sendtargets -p 192.168.49.52
iscsiadm -m discovery -t sendtargets -p 192.168.49.53
iscsiadm -m discovery -t sendtargets -p 192.168.49.54

#static add the node (faster access to LUNs)
iscsiadm -m node -o new -T iqn.1992-08.com.netapp:sn.f5596ed2949811e5af3c00a09899c7d0:vs.3 -p 192.168.49.51
iscsiadm -m node -o new -T iqn.1992-08.com.netapp:sn.f5596ed2949811e5af3c00a09899c7d0:vs.3 -p 192.168.49.52
iscsiadm -m node -o new -T iqn.1992-08.com.netapp:sn.f5596ed2949811e5af3c00a09899c7d0:vs.3 -p 192.168.49.53
iscsiadm -m node -o new -T iqn.1992-08.com.netapp:sn.f5596ed2949811e5af3c00a09899c7d0:vs.3 -p 192.168.49.54

#allow system to catch up
sleep 5
#loging to storage right now or reboot to ensure it works on reboot
iscsiadm -m node -T iqn.1992-08.com.netapp:sn.f5596ed2949811e5af3c00a09899c7d0:vs.3 -p 192.168.49.51 -l
iscsiadm -m node -T iqn.1992-08.com.netapp:sn.f5596ed2949811e5af3c00a09899c7d0:vs.3 -p 192.168.49.52 -l
iscsiadm -m node -T iqn.1992-08.com.netapp:sn.f5596ed2949811e5af3c00a09899c7d0:vs.3 -p 192.168.49.53 -l
iscsiadm -m node -T iqn.1992-08.com.netapp:sn.f5596ed2949811e5af3c00a09899c7d0:vs.3 -p 192.168.49.54 –l

Join the Pool

image

image

image

image

image

Citrix World and Symantec Best Practice Notes and configurations


I get a headache when I have to go over anything Anti-Virus but non the less I a have compiled a list of articles that covers a best/good practice when it comes to AV and Citrix. This list is not scientific but hopefully a start. I will include the links when I get more of a chance but I found some notes to myself and figured I would share.

Summary of recommended Citrix

· Scan on write events or only when files are modified. It should be noted that this configuration is typically regarded as a high security risk by most antivirus vendors. In high-security environments, organizations should consider scanning on both read and write events to protect against threats that target memory, such as Conficker variants.

· Scan local drives or disable network scanning. This assumes all remote locations, which might include file servers that host user profiles and redirected folders, are being monitored by antivirus and data integrity solutions.

· Exclude the pagefile(s) from being scanned.

· Exclude the Print Spooler directory from being scanned.

· Exclude specific files and folders within the \Program Files\Citrix directory that are accessed or modified frequently. For example, the Local Host Cache (imalhc.mdb) and Application Streaming offline database (RadeOffline.mdb) files may need to be excluded from the \Independent Management Architecture sub-directory. The local Resource Manager Summary Database file (RMLocalDatabase.mdb) may also need to be excluded from the \Citrix Resource Manager\LocalDB sub-directory. If Application Streaming is used, the \RadeCache and \Deploy folders may need to be excluded as well. While entire directories can be excluded, it should be noted that this is not considered a best practice by most antivirus vendors. In high-security environments, organizations should consider excluding specific files using exact names, such as ‘imalhc.mdb’. If exact file names cannot be used, Citrix recommends using wildcard exclusions to limit the attack surface area.

· Remove any unnecessary antivirus related entries from the Run key (HKLM\Software\Microsoft\Windows\Current Version\Run).

· If pass-through authentication is being used, for example, in a XenDesktop or Shared Hosted desktop scenario, exclude the XenApp Online Plug-in bitmap cache directory (typically %AppData%\ICAClient\Cache).

· If using the streamed user profile feature of Citrix Profile management, ensure the antivirus solution is configured to be aware of Hierarchical Storage Manager (HSM) drivers. For more information, refer to Profile Streaming and Enterprise Antivirus Products


Citrix Provisioning AV Best practices

· Limit antivirus definition updates to the Target Device. Create a plan to upgrade the vDisk periodically using manual, automatic, or automated techniques, such as Automatic vDisk updates or by using something like WorkFlow Studio.

· Avoid scanning the disk write cache location regardless of where this file resides. In limited testing, it is observed that most scanners cannot detect a virus within this location, because of their inherent design and the methods used to determine a virus.

· Avoid scanning the BNDevice.exe process on the Target Device. There are a few drivers that should be excluded from scanning in the <systemroot>\Windows\System32\Drivers folder such as:

o Provisioning Server 5.6 exclude BNNS.sys, BNNF.sys, BNPort.sys, bnistack.sys, and BNITDI.sys

o Provisioning Server 6.0 or later exclude bnistack6.sys,CvhdBusP6.sys, CFsDep2 .sys

· Avoid scanning the following processes on the Provisioning Server

o StreamService.exe

o StreamProcess.exe

o soapserver.exe

NDIS Filter Driver from Third Party Product on Target Device Interferes with Connection to Provisioning Services
The load order of the NDIS filter driver from third party product might interfere with the connection to Provisioning Services. The Start type of the driver must be 0x0(Boot) to utilize Provisioning Services properly. Otherwise, Provisioning Services driver cannot send and receive packets at the time of OS start.

Important! Citrix recommends you to consult the third party before trying the following solution.

Caution! Refer to the Disclaimer at the end of this article before using Registry Editor.

[HKEY_LOCAL_MACHINE\SYSTEM\CurrentControlSet\services\(driver name)]

"Type"=dword:00000001

"Start"=dword:00000000

"ErrorControl"=dword:00000001

"Tag"=dword:00000018

"Group"="NDIS"

"NdisMajorVersion"=dword:00000006

"NdisMinorVersion"=dword:00000000

Note: It is a necessary condition that Start type is set to 0x0(Boot). However, other factors in network driver of third party product could also cause an interference with Provisioning Services. See also CTX117395


EdgeSight client AV Best practices

Complete the following procedure to configure your antivirus software (TrendMicro, Symantec, Norton, McAfee and so on.) to NOT scan the EdgeSight data folder or processes. This should be done on all of the devices that are or will be running the EdgeSight agent. You might need to contact your security administration team to put these exceptions in place enterprise wide.

Note: Citrix recommends that you follow this procedure before the deployment of any EdgeSight agents.Exclude the following agent folders from being scanned. Check a few agent devices to confirm the exact folder locations in your environment. These folders contain the EdgeSight agent database file and many log files. Following is the default installation location:

<AllUserProfile>\Application Data\Citrix\System Monitoring\Data

Exclude the following EdgeSight agent executables (processes) from being scanned. Listed below are the default installation locations:

<ProgramFiles>\Citrix\System Monitoring\Agent\Core\rscorsvc.exe

<ProgramFiles>\Citrix\System Monitoring\Agent\Core\Firebird\bin\fbserver.exe


Microsoft Recommendations (link below) AV Best Practices

Turn off scanning of Windows Update or Automatic Update related files

· Turn off scanning of the Windows Update or Automatic Update database file (Datastore.edb). This file is located in the following folder:
%windir%\SoftwareDistribution\Datastore

· Turn off scanning of the log files that are located in the following folder:
%windir%\SoftwareDistribution\Datastore\Logs
Specifically, exclude the following files: ◦ Res*.log
Edb*.jrs
Edb.chk
Tmp.edb
The wildcard character (*) indicates that there may be several files.

Turn off scanning of Windows Security files

Add the following files in the %windir%\Security\Database path of the exclusions list:
*.edb

*.sdb

*.log

*.chk

*.jrs

Note If these files are not excluded, antivirus software may prevent proper access to these files, and security databases can become corrupted. Scanning these files can prevent the files from being used or may prevent a security policy from being applied to the files. These files should not be scanned because antivirus software may not correctly treat them as proprietary database files.

Turn off scanning of Group Policy related files

Group Policy user registry information. These files are located in the following folder:

%allusersprofile%\

Specifically, exclude the following file:

NTUser.pol

Group Policy client settings file. This file is located in the following folder:

%Systemroot%\System32\GroupPolicy\

Specifically, exclude the following file:

Registry.pol


SEP Best practices on Terminal Servers

Symantec Endpoint Protection client will run acceptably on Windows Terminal Servers; however there are a few modifications than can be made in order to optimise the overall user experience.

AntiVirus and AntiSpyware protection

The following recommendations should be taken into account:

Configure Auto-Protect to:

· Scan when a file is modified

· Disable network scanning

Centralized Exceptions

It is recommended to:

· Exclude the pagefile

· Exclude the print spooler folder

· If the server is a license server, exclude the license server folder and databases

Some server administrators may wish to exclude their users roaming profiles and/or “My Documents” folders from being scanned for security risks. While this will improve performance, Symantec would not recommend this approach – in practice this is generally the location in which

security risks are discovered.

Scheduled Scans

If a scheduled scan is required then it should be run out of hours in order to minimise user impact. In addition, ActiveScans when new definitions arrive and startup scans should not be run as they could place unnecessary load on the terminal server during business hours.

Tamper Protection

There are no tamper protection recommendations for a server just running Terminal Services

Network Threat Protection

Although it is not recommended to run Network Threat Protection on terminal servers, it is entirely possible to do so. The default Symantec Endpoint Protection rule set will allow all terminal services functions to work correctly. However, it should be noted that if a custom rule set is

created, the following services and ports should be allowed:

In addition to the AntiVirus and AntiSpyware exclusions for standard terminal servers, the following exclusions are recommended for Citrix servers:

1. Citrix program files folder

2. Citrix configuration database if present on the server

It is recommended that the following process is excluded from Tamper Protection on Citrix servers, as it is known to cause problems:

· ctxcpusched.exe – for more details on this process and how to create an exclusion for it, please refer to Appendix E.


SEP in non persistent VDesktops

Step

Using Symantec Endpoint Protection in non-persistent virtual desktop infrastructures

Step 1

Set up the base image.

See Setting up the base image for non-persistent guest virtual machines in virtual desktop infrastructures.

Step

Setting up the base image for non-persistent guest virtual machines in virtual desktop infrastructures

Description

Step 1

Install Symantec Endpoint Protection on the base image.

See About client deployment methods.

Step 2

In Symantec Endpoint Protection Manager, disable Tamper Protection so that you can modify the registry.

See Changing Tamper Protection settings.

TO change Tamper Protection settings

1. In the console, click Clients.

2. On the Policies tab, under Settings, click General Settings.

3. On the Tamper Protection tab, check or uncheck Protect Symantec security software from being tampered with or shut down.

4. In the list box under Actions to take if an application attempts to tamper with or shut down Symantec security software, select one of the following actions:

5. Log only

6. Block and do not log

7. Block and log

8. Click the icon to lock or unlock the options on client computers. When you lock an option, you prevent user changes to the option.

9. 6.Click OK.

Step 3

Create a registry key on the base image to mark the GVMs as non-persistent clients.

See Creating a registry key to mark the base image Guest Virtual Machines (GVMs) as non-persistent clients.

To create a registry key to mark the base image GVMs as non-persistent clients

1. After you have installed the Symantec Endpoint Protection client and disabled Tamper Protection, open the registry editor on the base image.

2. Navigate to HKEY_LOCAL_MACHINE\SOFTWARE\Symantec\Symantec Endpoint Protection\SMC\.

3. Create a new key named Virtualization.

4. Under Virtualization, create a key of type DWORD named IsNPVDIClient and set it to a value of 1.

Step 4

In Symantec Endpoint Protection Manager, enable Tamper Protection again.

See Changing Tamper Protection settings.

Step 2

In Symantec Endpoint Protection Manager, configure a separate purge interval for offline non-persistent VDI clients.

See Configuring a separate purge interval for offline non-persistent VDI clients.
Configuring a separate purge interval for offline non-persistent VDI clients

To configure the purge interval for offline non-persistent VDI clients

1.In the Symantec Endpoint Protection Manager console, on the Admin page, click Domains.

2.In the Domains tree, click the desired domain.

3.Under Tasks, click Edit Domain Properties.

4.On the Edit Domain Properties > General tab, check the Delete non-persistent VDI clients that have not connected for specified time checkbox and change the days value to the desired number.

The Delete clients that have not connected for specified time option must be checked to access the option for offline non-persistent VDI clients.

5.Click OK.

Best practices for virtualization with Symantec Endpoint Protection 12.1, 12.1 RU1, and 12.1 RU1 MP1

http://www.symantec.com/business/support/index?page=content&id=TECH173650

Too many to list

Symantec Endpoint Protection 12.1 – Non-persistent Virtualization Best Practices

Client Recommendations

The following configuration recommendations will ensure that SEP client installations in non-persistent VDI environments do not generate network and disk IO from advanced SEP client features which they will not benefit from.

1.Make the following changes to the Communications Settings policy:

1.Configure clients to download policies and content in Pull mode

2.Disable the option to Learn applications that run on the client computers

3.Set the Heartbeat Interval to no less than one hour

4.Enable Download Randomization, set the Randomization window for 4 hours

Make the following changes to the Virus and Spyware Protection policy:

1.Disable all scheduled scans

2.Disable the option to "Allow startup scans to run when users log on" (This is disabled by default)

3.Disable the option to "Run an ActiveScan when new definitions Arrive"

3.Avoid using features like application learning which send information to the SEPM and rely on client state to optimize traffic flow

Image Maintenance

Add the following steps to the routine maintenance schedule for base images. Symantec recommends performing these maintenance tasks at least once a week.

1.Update all applicable definitions and security content on the base image with the latest content available

2.Confirm the SEP client on the base image is able to communicate with its SEPM server(s)

3.Confirm the SEP client is using the correct VDI-specific policies

Before redistributing the image:

1.Remove any temporary files associated with the SEP client, including

2.Remove hardware key information from the base image using How to prepare a Symantec Endpoint Protection 12.1 client for cloning

Follow the general best practices below for periodic image maintenance and testing.

1.Manually upgrade the SEP client on the base image rather than using auto-upgrade for the VM client policy groups

2.Test performance optimizations. For instance, reducing memory allocated to a VM can cause increased OS swapping and defeat hypervisor optimizations like memory page deduplication

3.To minimize the size of the base VM image, disable client install caching and set content cache revisions to 1. See http://www.symantec.com/business/support/index?page=content&id=TECH106042

4.Configure VM refreshes to occur on logoff. Set the pool of available VM’s large enough so that users can easily access a running image which was updated in the background

Symantec Endpoint Protection Manager settings

1.Configure SEPM to keep definitions at least as long as the minimum image refresh frequency. E.g. Keep 30 days if the maximum image age is 14 days

2.SEPM will ‘remember’ all new images attaching, which can build up quickly in a VDI environment. An admin can either reduce the interval required for clients to age out of SEPM or periodically run a cleanup script which purges the old client records.

Reference Articles

Citrix Guidelines for Antivirus Software Configuration

http://support.citrix.com/article/CTX127030

Provisioning Services Antivirus Best Practices

http://support.citrix.com/article/CTX124185

Required Antivirus Software Configuration for the EdgeSight Server

http://support.citrix.com/article/CTX114906

Virus scanning recommendations for Enterprise computers that are running currently supported versions of Windows

http://support.microsoft.com/kb/822158

NDIS Filter Driver from Third Party Product on Target Device Interferes with Connection to Provisioning Services

http://support.citrix.com/article/CTX137505

derived from this article

SEP Firewall does not function with Citrix’s Provisioning Server.

http://www.symantec.com/business/support/index?page=content&id=TECH205982

Here are the details about the new separate VDI purging interval:

http://www.symantec.com/business/support/index?page=content&id=HOWTO81133#v75342792 (step 2 has already been done in the manager)

Some documents on best practices (we’d have to chat about some of these… def updates are vitally important unfortunately, so updating only the base image won’t fly):

http://www.symantec.com/business/support/index?page=content&id=TECH173650 (virtualization in general)

http://www.symantec.com/business/support/index?page=content&id=TECH180229 (VDI non-persistent clients

Also

Issues with Citrix XenDesktop / PvD and Symantec Endpoint Protection 12.1

http://www.symantec.com/connect/forums/issues-xendesktop-pvd-and-symantec-endpoint-protection-121

leads to

Installing Symantec Endpoint protection on a VDI with Personal Vdisk

http://discussions.citrix.com/topic/330203-installing-symantec-endpoint-protection-on-a-vdi-with-personal-vdisk

Using Sysinternals ProcMon to capture registry changes

​I came across an issue to which  I needed to change a setting via Group Policy in Internet Explorer but could not find the matching GPO setting. It simply may have been under my nose in the GPO but I simply could not find it. So I went back to an old trick using Sysinternals ProcMon.

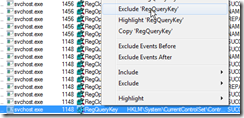
I figured if I can sleuth out what the registry key was then I could create a GPO preference which would obtain the results I needed to correct the issue. To find out what the registry entry was I simply opened up IE and navigated to the setting I needed to change. But before I made the change in IE I also opened up ProcMon in parallel and created a few filters to reduce some of the noise such as the registry icon….

!cid_image003_png@01CFCBBA

As well I wanted to see only the RegSetValue Operation as I was only interested in registry changes so I excluded all other registry queries etc….

!cid_image004_png@01CFCBBA

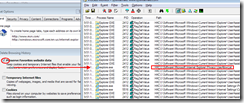
As mentioned I had IE open at the same time. As you see below I wanted to change the “Preserve Favorites website data” setting. I selected/deselected the parameter in IE and I was able to capture what the registry modification was…..

!cid_image005_png@01CFCBBA

Now that I know what the registry entry is I created a GPO preference to "deselect" the setting. Once again GPO’s are awesome.

Debugging XenApp Crash Errors


We have been getting reports of more and more IE and Outlook crashes. So to try and get a little more insight into this I am invoking the application crash dumps to try to see the issue. This is not limited to Citrix servers but can be done via Windows 7 or 2008 so if you are having issues with application crashes this may help you find the problem. Here is how I did this:
 
Enable Crash dumps on XenApp
 
Based on this article http://support.citrix.com/article/CTX118614 I created a GPO preference to enable this feature. Here is the configurations:

image

As you can see once I did  GPUPDATE I started to see some .dmp files. 
 

image

Install Debugging Tools

Then one needs to install the debugging tools. This can be found at http://msdn.microsoft.com/en-us/windows/hardware/hh852365 and the link within that page is http://www.microsoft.com/en-us/download/confirmation.aspx?id=8279 (Debugging Tools for Windows (WinDbg)
 

Executing the WindDebug command

Once you have the tools installed you navigate to the tools folder "c:\Program Files\Debugging Tools for Windows (x64)>cd "c:\Program Files\Debugging Tools for Windows (x64)".

The command to execute the tools is 

c:\Program Files\Debugging Tools for Windows (x64)>windbg -y srv*c:\symbols*http://msdl.microsoft.com/download/symbols -i c:\windows\i386 -z <path to dump files>

The path in red indicates that I simply used the Microsoft provided symbols online. The green I simply mapped a drive to the location of the files. In this case it is the D drive on the XenApp server. So my command looks like:
 
c:\Program Files\Debugging Tools for Windows (x64)>windbg -y srv*c:\symbols*http://msdl.microsoft.com/download/symbols -i c:\windows\i386 –z D:\Citrix\Crashdumps\iexplore.exe.22840.dmp
 
Once the command is executed the debug screen will appear like below:

image

 Analyzing the Crash Dump

Once the Windebugging tool executes you want to peform a more verbose output. This is done by simply entering in !analyze -v on the bottom line

image

The reason I created the preferences is that my XenApp servers are provisioned and read-only. As well that I will disable the preferences when I am done troubleshooting. I have a D: drive that I use which is local physical hardware to capture the dumps which also is where my vDiskCache, page file, etc live.
 
As you can see once I did  GPUPDATE I started to see some .dmp files.


Microsoft (R) Windows Debugger Version 6.12.0002.633 AMD64
Copyright (c) Microsoft Corporation. All rights reserved.

Loading Dump File [y:\Citrix\Crashdumps\OUTLOOK.EXE.25360.dmp]
User Mini Dump File with Full Memory: Only application data is available

WARNING: Inaccessible path: ‘c:\windows\i386’
Symbol search path is: srv*c:\symbols*
http://msdl.microsoft.com/download/symbols
Executable search path is: c:\windows\i386
Windows 7 Version 7601 (Service Pack 1) MP (24 procs) Free x86 compatible
Product: Server, suite: Enterprise TerminalServer
Machine Name:
Debug session time: Fri Mar  7 09:50:09.000 2014 (UTC – 8:00)
System Uptime: 0 days 2:15:23.903
Process Uptime: 0 days 0:00:08.000
……………………………………………………….
……………………………………………………….
……………….
Loading unloaded module list
………..
This dump file has an exception of interest stored in it.
The stored exception information can be accessed via .ecxr.
(6310.5adc): Unknown exception – code c0000374 (first/second chance not available)
eax=00000000 ebx=00000000 ecx=7fffffff edx=00000000 esi=08940000 edi=00006310
eip=77bef8d1 esp=0804e6e0 ebp=0804e764 iopl=0         nv up ei pl zr na pe nc
cs=0023  ss=002b  ds=002b  es=002b  fs=0053  gs=002b             efl=00000246
ntdll!NtWaitForSingleObject+0x15:
77bef8d1 83c404          add     esp,4
0:023> !analyze -v
*******************************************************************************
*                                                                             *
*                        Exception Analysis                                   *
*                                                                             *
*******************************************************************************

*** ERROR: Symbol file could not be found.  Defaulted to export symbols for rsintcor32.dll –
*** ERROR: Symbol file could not be found.  Defaulted to export symbols for MSO.DLL –
*** ERROR: Symbol file could not be found.  Defaulted to export symbols for OUTLOOK.EXE –
*** ERROR: Symbol file could not be found.  Defaulted to export symbols for csma_ldr32.dll –
*** ERROR: Symbol file could not be found.  Defaulted to export symbols for OLMAPI32.DLL –
*** ERROR: Symbol file could not be found.  Defaulted to export symbols for SOCIALCONNECTOR.DLL –
*** ERROR: Symbol file could not be found.  Defaulted to export symbols for EMSMDB32.DLL –
*** ERROR: Symbol file could not be found.  Defaulted to export symbols for BCSAddin.dll –
*** ERROR: Symbol file could not be found.  Defaulted to export symbols for Valkyrie.dll –
GetPageUrlData failed, server returned HTTP status 404

FAULTING_IP:
ntdll!RtlReportCriticalFailure+57
77c9e753 eb12            jmp     ntdll!RtlReportCriticalFailure+0x6b (77c9e767)

EXCEPTION_RECORD:  ffffffff — (.exr 0xffffffffffffffff)
ExceptionAddress: 77c9e753 (ntdll!RtlReportCriticalFailure+0x00000057)
   ExceptionCode: c0000374
  ExceptionFlags: 00000001
NumberParameters: 1
   Parameter[0]: 77cd4270

PROCESS_NAME:  OUTLOOK.EXE

ERROR_CODE: (NTSTATUS) 0xc0000374 – A heap has been corrupted.

EXCEPTION_CODE: (NTSTATUS) 0xc0000374 – A heap has been corrupted.

EXCEPTION_PARAMETER1:  77cd4270

MOD_LIST: <ANALYSIS/>

NTGLOBALFLAG:  0

APPLICATION_VERIFIER_FLAGS:  0

FAULTING_THREAD:  00005adc

BUGCHECK_STR:  APPLICATION_FAULT_ACTIONABLE_HEAP_CORRUPTION_heap_failure_block_not_busy_DOUBLE_FREE

PRIMARY_PROBLEM_CLASS:  ACTIONABLE_HEAP_CORRUPTION_heap_failure_block_not_busy

DEFAULT_BUCKET_ID:  ACTIONABLE_HEAP_CORRUPTION_heap_failure_block_not_busy

LAST_CONTROL_TRANSFER:  from 77c9f659 to 77c9e753

STACK_TEXT: 
0804ecb4 77c9f659 c0000374 77cd4270 0804ecf8 ntdll!RtlReportCriticalFailure+0x57
0804ecc4 77c9f739 00000002 7fb27b0e 00000000 ntdll!RtlpReportHeapFailure+0x21
0804ecf8 77c4e045 00000008 00710000 05579ee0 ntdll!RtlpLogHeapFailure+0xa1
0804ed28 77c12714 00710000 00000002 05579ee8 ntdll!RtlFreeHeap+0x64
0804ee40 77c125df 05579ee8 0000000c 05579ee8 ntdll!RtlpReAllocateHeap+0x190
0804eeb4 751e675b 00710000 00000000 05579ee8 ntdll!RtlReAllocateHeap+0x2c5
0804ef08 751e62e1 05579ee8 0000000c 751e6289 msvcr90!realloc+0x35f
0804ef24 6c2fbb5e 05579ee8 00000003 00000004 msvcr90!_recalloc+0x58
WARNING: Stack unwind information not available. Following frames may be wrong.
0804ef58 6c300b7c 02f0d378 6c31288c 00000007 rsintcor32!RslLoadedTerm+0x3ce2
0804efa0 6c2fcd1f 00000001 48a83599 02f0d378 rsintcor32!RslLoadedTerm+0x8d00
0804efd8 6c2fdaab 05578fe8 00000000 06b1c540 rsintcor32!RslLoadedTerm+0x4ea3
0804f020 6c2fd9dc 02f0d378 00000001 05578fe8 rsintcor32!RslLoadedTerm+0x5c2f
0804f058 6c30092a 02f0d378 00000001 00001b84 rsintcor32!RslLoadedTerm+0x5b60
0804f148 75c34c05 00001b84 06b1c540 00000087 rsintcor32!RslLoadedTerm+0x8aae
0804f194 75c349c8 080914b8 0804f1e0 0043b410 wininet!ICSocket::Send_Start+0x21d
0804f1ac 75c306a8 0043b410 00000000 0043b410 wininet!CFsm_SocketSend::RunSM+0x2e
0804f1f8 75c3496f 080835c8 00000000 00000000 wininet!CFsm::Run+0x159
0804f220 75c31d33 06b1c540 00000087 00000020 wininet!ICSocket::Send+0x106
0804f278 75c319ed 0804f2c0 00456968 080835c8 wininet!HTTP_REQUEST_HANDLE_OBJECT::SendRequest_Fsm+0x329
0804f28c 75c306a8 00456968 06b1e5d8 00000000 wininet!CFsm_SendRequest::RunSM+0x28
0804f2d8 75c32970 080835c8 00000000 00000000 wininet!CFsm::Run+0x159
0804f498 75c313a6 0809e630 06b1e5d8 0804f500 wininet!HTTP_REQUEST_HANDLE_OBJECT::HttpSendRequest_Start+0x66a
0804f4cc 75c306a8 00000000 00000000 06b1e5d8 wininet!CFsm_HttpSendRequest::RunSM+0x38
0804f518 75c30a96 080835c8 00000000 00000000 wininet!CFsm::Run+0x159
0804f538 75c7bbba 06b66970 06b66a28 00000000 wininet!DoFsm+0x55
0804f594 75c7da91 08098b58 0000000d 00000000 wininet!HttpWrapSendRequest+0x429
0804f5b8 75cf3a6f 00cc002c 08098b58 0000000d wininet!InternalHttpSendRequestA+0x2f
0804f70c 75c306a8 06b66970 00000000 06b66970 wininet!ParseHttpUrl_Fsm+0x257
0804f758 75c30a96 080835c8 00000000 00000000 wininet!CFsm::Run+0x159
0804f778 75ccea58 0804f800 06b6a8b8 75cc6218 wininet!DoFsm+0x55
0804f7b4 75ccf279 00000000 0804f800 06b6a8b8 wininet!ParseUrlForHttp_Fsm+0x27b
0804f7cc 75c306a8 06b6a8b8 00000000 06b6a8b8 wininet!CFsm_ParseUrlForHttp::RunSM+0x54
0804f818 75c30a96 080835c8 00000000 00000000 wininet!CFsm::Run+0x159
0804f838 75ccd13f 00000000 0804f8b8 0804f95c wininet!DoFsm+0x55
0804f890 75ccd255 00cc0024 06affde0 75cc6488 wininet!InternalInternetOpenUrlA+0x218
0804f8f0 75cf226e 00cc0024 06affde0 75cc6488 wininet!InternetOpenUrlA+0x3e
0804f930 75cf1ff1 00cc0024 06affde0 00000000 wininet!WininetProxySupport::OpenUrl+0xa4
0804f984 75d150a6 06b31428 08097748 00000001 wininet!WininetProxySupport::DownloadFile+0xc3
0804f9ac 75d14e57 08097748 00000000 00000000 wininet!DownloadScript+0x51
0804f9d8 75d158b6 08097748 00000000 00000000 wininet!DownloadProxyInfo+0x58
0804fa58 75c939f5 004aee60 06b65378 0804fadc wininet!SwpadWpad+0x299
0804fa68 77c39512 06b6ea70 7fb26d2a 0040f6f8 wininet!RefCountWorkItemThread+0xe
0804fadc 77c24429 06b6ea70 06b65378 7fb26bca ntdll!RtlpTpWorkCallback+0x11d
0804fc3c 7576336a 0040f6f0 0804fc88 77c09f72 ntdll!TppWorkerThread+0x572
0804fc48 77c09f72 0040f6f0 7fb26b7e 00000000 kernel32!BaseThreadInitThunk+0xe
0804fc88 77c09f45 77c23e85 0040f6f0 ffffffff ntdll!__RtlUserThreadStart+0x70
0804fca0 00000000 77c23e85 0040f6f0 00000000 ntdll!_RtlUserThreadStart+0x1b

FOLLOWUP_IP:
msvcr90!realloc+35f
751e675b 8bf8            mov     edi,eax

SYMBOL_STACK_INDEX:  6

SYMBOL_NAME:  msvcr90!realloc+35f

FOLLOWUP_NAME:  MachineOwner

MODULE_NAME: msvcr90

IMAGE_NAME:  msvcr90.dll

DEBUG_FLR_IMAGE_TIMESTAMP:  4ca2ef57

STACK_COMMAND:  ~23s; .ecxr ; kb

FAILURE_BUCKET_ID:  ACTIONABLE_HEAP_CORRUPTION_heap_failure_block_not_busy_c0000374_msvcr90.dll!realloc

BUCKET_ID:  APPLICATION_FAULT_ACTIONABLE_HEAP_CORRUPTION_heap_failure_block_not_busy_DOUBLE_FREE_msvcr90!realloc+35f

WATSON_STAGEONE_URL: 

Followup: MachineOwner
———

Mail Icon missing in Control Panel


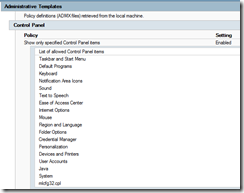
When we publish out a shared desktop in Citrix we restrict the control panel items via Group Policy (seen below) that way non admins using the desktop do not have access to system management items. So we need to make exceptions and the Mail icon is included with this.

mail1

Technorati Tags:

The items listed above are the items that we have exceptions for. For some of the items I was able to I was able to simply write the “visual name” of the item in the control panel and then the icon would show up. However the ticket was delayed as I needed to figure out what the magic bullet was. I tried Mail or Mail (32-bit) but the icon would not show up. So this morning I tried putting the actual application cpl name and “voila”, it shows up.

mail2

Streaming Java in Internet Explorer, which one do I use?

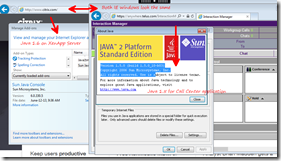
Streaming different java versions to Internet Explorer in a shared XenApp desktop or XenDesktop can be confusing from the user perspective due to the fact the user can’t always tell which Internet Explorer contains which version of Java? The user isn’t really expected to know nor are users generally computer savvy enough to know the difference. For example in the screen cap below you would not notice in a side by side comparison which Internet Explorer has Java 1.5 and which one is using 1.7:

Java1

Technorati Tags:

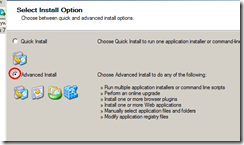
The user could easily lose track of which browser has which version of Java. So what we want to do is make a distinction between the streamed version and the local version. This can easily be done by adding a registry entry to the profiled Java application simply open your Profiled Java and modify the properties. Go to Advanced install….

java2

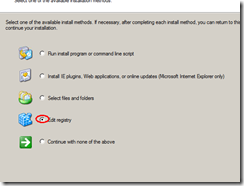
Edit the registry….

java3

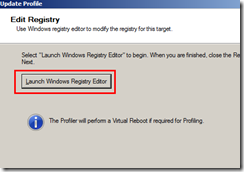
Launch the registry….

java4

Create the following registry keys

SOFTWARE\Policies\Microsoft\Internet Explorer\Toolbars\Restrictions DWORD=NoNavBar VALUE=1

SOFTWARE\Policies\Microsoft\Internet Explorer\Toolbars\Restrictions DWORD=NoAddressBar VALUE=1

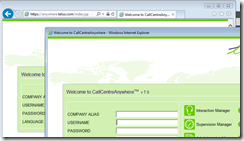
Save the profile and republish. Once complete launch the application again and you should see

java5

You can see the IE browser on the right now has no address bar or tabs. This way the user will use the browser with the address bar with the locally installed Java without issue. The one with the streamed java and no address bar will only be used for the application intended.

Scripts to Monitor XenDesktop


To ensure our XenDesktops are up and functional for the day I have created a morning check script perform this task. The check will look for:

  • UNREGISTERED MACHINES
  • REGISTERED MACHINES
  • MACHINES IN MAINTENANCE MODE
     

Ideally we will only see machines that in the REGISTERED category. Here is the PowerShell script that was created and run from the Desktop Delivery Controller

Reference

XenDesktop Monitoring: Desktop Availability

http://blogs.citrix.com/2012/10/27/xendesktop-monitoring-desktop-availability/


#
# XenDesktop Monitoring: Desktop Availability
# Created March 1 2013 – Trevor Svienson
# Written by – Miguel Contreras Citrix
# Load Citrix PowerShell modules
#

# Set-ExecutionPolicy RemoteSigned

#
# Load the XenDesktop Snapins
#

Asnp Citrix.*

#
# Check VMs that failed to reboot
#

$badVMs = Get-BrokerDesktop -PowerActionPending $false -PowerState On -SummaryState Available -WillShutdownAfterUse $true -MaxRecordCount 5000
If ($badVMs)
{
   foreach($vm in $badVMs)
   {
      New-BrokerHostingPowerAction -MachineName $vm.HostedMachineName -Action ‘Reset’
   }
}

#
#Check for VMs in maint mode and unregistered, and send email report
#

$recipients = "alert.citrix@svi-virtualsolutions.com"
$fromEmail = "XenDesktopProd@svi-virtualsolutions.com"
$server = "mail.svi-virtualsolutions.com"
$time = Get-Date ?format d

[string]$unregisteredVMs = (Get-BrokerDesktop -MaxRecordCount 5000 | ? {($_.RegistrationState -eq ‘Unregistered’) -and ($_.PowerState -eq ‘On’)} | select HostedMachineName,DesktopGroupName,LastDeregistrationReason | ft -wrap -autosize | Out-String)

[string]$registeredVMs = (Get-BrokerDesktop -MaxRecordCount 5000 | ? {($_.RegistrationState -eq ‘Registered’) -and ($_.PowerState -eq ‘On’)} | select HostedMachineName,DesktopGroupName,LastDeregistrationReason | ft -wrap -autosize | Out-String)

[string]$maintenanceModeVMs = (Get-BrokerDesktop -MaxRecordCount 5000 | ? {$_.InMaintenanceMode -eq ‘True’} | select HostedMachineName,DesktopGroupName,LastDeregistrationReason | ft -wrap -autosize | Out-String)

[string]$emailBody = "UNREGISTERED MACHINES `n`n`n $unregisteredVMs" + "REGISTERED MACHINES `n $registeredVMs" + "`n" + "MACHINES IN MAINTENANCE MODE `n $maintenanceModeVMs"

#
#Send it off
#

send-mailmessage -from $fromEmail -to $recipients -subject "XenDesktop Prod Daily Check $currentTime" -body $emailBody

Here is the end result via email:

UNREGISTERED MACHINES
REGISTERED MACHINES
HostedMachineName DesktopGroupName LastDeregistrationR
eason
—————– —————- ——————-
WINDOWS764MCS01 MCS – Pooled  Windows 7 x64 AgentShutdown
WINDOWS764MCS02 MCS – Pooled  Windows 7 x64 AgentShutdown
WINDOWS764MCS03 MCS – Pooled  Windows 7 x64 AgentShutdown
WINDOWS764MCS04 MCS – Pooled  Windows 7 x64 AgentShutdown
WINDOWS764MCS05 MCS – Pooled  Windows 7 x64 AgentShutdown
WINDOWS764MCS06 MCS – Pooled  Windows 7 x64 AgentShutdown
WINDOWS7UAT999 MCS – Windows 7 x64 – Master AgentShutdown
WINDOWS764NPX001 VDI – Windows 7 x64 – AssetGen Prod AgentShutdown
WINDOWS764NPX002 VDI – Windows 7 x64 – AssetGen Dev AgentShutdown
WINDOWSMCS101 MCS – Pooled  Windows XP x86 AgentShutdown
WINDOWSMCS103 MCS – Pooled  Windows XP x86 AgentShutdown
WINDOWSMCS104 MCS – Pooled  Windows XP x86 AgentShutdown
WINDOWSMCS105 MCS – Pooled  Windows XP x86 AgentShutdown
WINDOWSMCS107 MCS – Pooled  Windows XP x86 AgentShutdown
WINDOWSMCS108 MCS – Pooled  Windows XP x86 AgentShutdown
WINDOWSMCS998 MCS – Windows XP x86 – Master ContactLost
WINDOWSVDIPRD001 VDI – Windows XP x86 – Image Now AgentShutdown
WINDOWSVDIPRD002 VDI – Windows XP x86  ContactLost
MACHINES IN MAINTENANCE MODE
HostedMachineName DesktopGroupName LastDeregistrationR
eason
—————– —————- ——————-
WINDOWSMCS107 MCS – Pooled  Windows XP x86 AgentShutdown
WINDOWSMCS108 MCS – Pooled  Windows XP x86 AgentShutdown


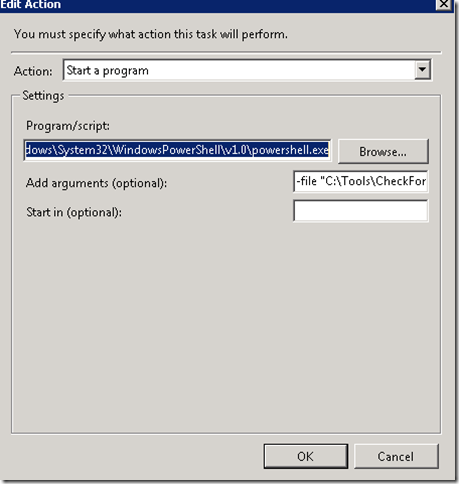
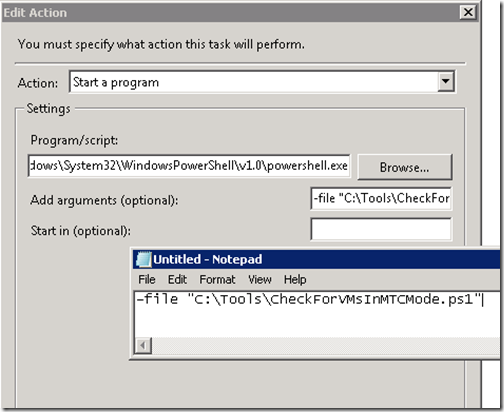
The script calls CheckForVMsInMTCMode.ps1 is located on the DDC in C:\tools folder. The script is run as a scheduled task which launches at 7 am daily.

Here is how the task is configured on the DDC:
Inside the daily task this is the Action. Simply launches PowerShell and then a command argument for launching the file:

SNAG-0059

Here is a more closer look at the argument:

SNAG-0060

Also remember to add the "rights" to run the file.

image

Testing the Script

In order to get this to work I ran some tests to see if this would work. A good references to do this is

Weekend Scripter: Use the Windows Task Scheduler to Run a Windows PowerShell Script
http://blogs.technet.com/b/heyscriptingguy/archive/2012/08/11/weekend-scripter-use-the-windows-task-scheduler-to-run-a-windows-powershell-script.aspx

SNAG-0064

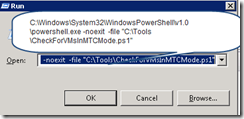
From the DDC I opened a run command and typed this

SNAG-0065

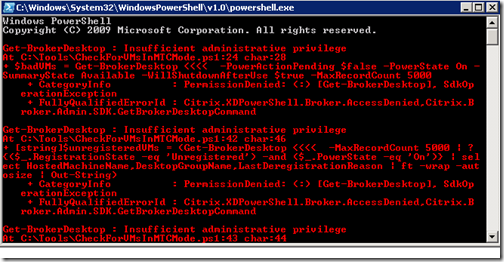
As you can see from the screen cap above I was receiving an "Insufficient administrative privilege" message which simply meant I did not have enough privileges to run the XenDesktop cmdlet. I had to elevate my privileges in order for this to complete from the run command. I also had to do the same in the daily task:

image

Another reference to run PowerShell from a daily task.

Run PowerShell Scripts from Task Scheduler
http://community.spiceworks.com/how_to/show/17736-run-powershell-scripts-from-task-scheduler

BSOD, PVS, XenServer and Pooled Desktop


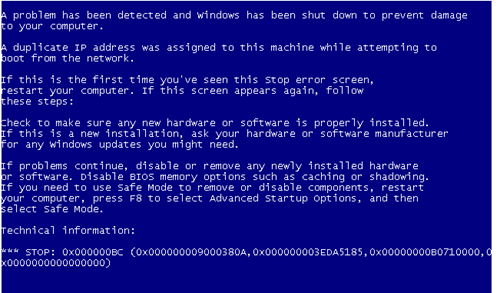
I was investigating as to why I had a VM that was not registering with the DDC during a morning check. When I checked the XenCenter console I observed this message:

XenCenter_2013-11-01_08-46-43

After some investigation I found I was not the only one having this issue:

http://forums.citrix.com/thread.jspa?threadID=305300

Based on the advice given in the forum I found that in  DHCP the IP was being assigned but eventually the BSOD was happening.

Remote%20Desktops_2013-11-01_08-36-33

I could not locate another VM with the same IP. So to correct issue I:

  • Deleted the above IP assigned in DHCP
  • I then created a reservation for the VM by doing a standard reservation in DHCP:

image


image

  • Once I did this I restarted the VM and the Desktop resumed normal operation.
  • As well based on the user forum I also changed the DHCP scope to an Unlimited lease time.


image