What is Remote PC?

Remember when one wanted to access their physical Windows desktop from off site or another location within the building we generally used Remote Desktop Protocol a.k.a RDP. You may be familiar with the icon:

AppVError2017-12-28 11_32_09-Citrix Receiver - Internet Explorer

RDP is a Microsoft connection protocol that has been around for quite a few years. However, as popular as it is there are also limitations with using RDP.

  • users cannot use multiple monitors
  • resizing the screen is a painful experience
  • multimedia capabilities are limited
  • graphics are limited

In order to give the user the best experience possible let us introduce Citrix RemotePC. RemotePC is based on Citrix’s ICA HDX protocol which is far superior than RDP and gives us the capabilities of the features that I listed above.

What are some of the differences?

When a user traditionally launches RDP to access their physical desktop from outside of the office, users generally log into the Citrix Storefront and launch the published application RDP as noted from the icon above.

In the diagram below we see that we actually initiate a “two step” process by launching the application RDP that is hosted on a server, then we make a 2nd connection to our physical PC

remotePC1

By using RDP we are adding a 2nd hop to our connection. RemotePC is different in that we are connecting directly to our physical PC without having to launch an application.

remotePC2

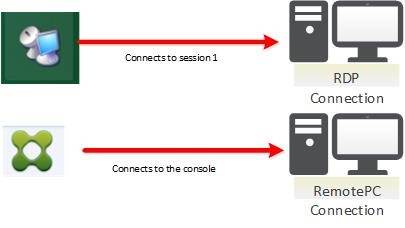
Connecting to the Console of the physical PC

RemotePC enables the best user experience as the connection is to the PC’s console vs RDP which actually connections to something called “session 1”.

remotePC3

This is significant to the user experience as RemotePC is just like sitting down at the physical desktop to work. Being able to connect to the PC’s console session allows us to use Multi-monitor support and resizing of the screen dynamically.

In order to use Citrix RemotePC the Citrix team simply has to install the agent onto your physical desktop.

XenServer Fresh Install

Been a while since we created a doc on an install so we thought we would update how to install a XenServer 7.1 LTSR.

From ISO

image

image

image

After the XenServer install we wanted to join the pool but received this error due to we have HP snmp installed on the other hosts in the pool.

image

How to install the HP Agent

This was a bit tricky but since this is an upgrade from 6.5 to 7.1 I had to obtain the one for our version

I initially tried this install

https://support.hpe.com/hpsc/swd/public/detail?swItemId=MTX_7b37f0101fff497d80265eec78#tab3 hp-agents-10.40-3.XS7.0.iso but ran into issues per this forum

https://community.hpe.com/t5/ProLiant-Servers-ML-DL-SL/Xenserver-HP-SNMP-Agents-for-Xenserver-7-1/td-p/6945225

This forum pointed me to this link

https://support.hpe.com/hpsc/swd/public/detail?swItemId=MTX_c550f218f9594d59b9c0c99784#tab2 hp-agents-10.50-2.XS7.iso

The first item was I used WinSCP to upload the folder to the host to the home drive

image

Then I ran these series of commands to install

cd /home

mkdir /mnt/iso

mount -ro loop hp-agents-10.50-2.XS7.iso /mnt/iso/

cd /mnt/iso/

./install.sh

The install went without issue

image

Configure Network        

image

image

Configure Storage ISCSI Connection

Once the storage guys have your IQDN number…..

image

There is a series of commands you invoke to configure the multi-pathing and discover. The Storage guys gave me a script I could run….

#add NetApp discovery
iscsiadm -m discovery -t sendtargets -p 192.168.49.51
iscsiadm -m discovery -t sendtargets -p 192.168.49.52
iscsiadm -m discovery -t sendtargets -p 192.168.49.53
iscsiadm -m discovery -t sendtargets -p 192.168.49.54

#static add the node (faster access to LUNs)
iscsiadm -m node -o new -T iqn.1992-08.com.netapp:sn.f5596ed2949811e5af3c00a09899c7d0:vs.3 -p 192.168.49.51
iscsiadm -m node -o new -T iqn.1992-08.com.netapp:sn.f5596ed2949811e5af3c00a09899c7d0:vs.3 -p 192.168.49.52
iscsiadm -m node -o new -T iqn.1992-08.com.netapp:sn.f5596ed2949811e5af3c00a09899c7d0:vs.3 -p 192.168.49.53
iscsiadm -m node -o new -T iqn.1992-08.com.netapp:sn.f5596ed2949811e5af3c00a09899c7d0:vs.3 -p 192.168.49.54

#allow system to catch up
sleep 5
#loging to storage right now or reboot to ensure it works on reboot
iscsiadm -m node -T iqn.1992-08.com.netapp:sn.f5596ed2949811e5af3c00a09899c7d0:vs.3 -p 192.168.49.51 -l
iscsiadm -m node -T iqn.1992-08.com.netapp:sn.f5596ed2949811e5af3c00a09899c7d0:vs.3 -p 192.168.49.52 -l
iscsiadm -m node -T iqn.1992-08.com.netapp:sn.f5596ed2949811e5af3c00a09899c7d0:vs.3 -p 192.168.49.53 -l
iscsiadm -m node -T iqn.1992-08.com.netapp:sn.f5596ed2949811e5af3c00a09899c7d0:vs.3 -p 192.168.49.54 –l

Join the Pool

image

image

image

image

image